
When you create a bot, you enter the bot-specific dashboard. This is where you configure how your chatbot looks, behaves, and responds.
Each bot has its own settings. Changes you make here affect only this bot.
What changed from the main dashboard?
The main dashboard shows all bots.
This view shows one specific bot.
You can think of it like this:
- Main dashboard = overview
- Bot dashboard = configuration
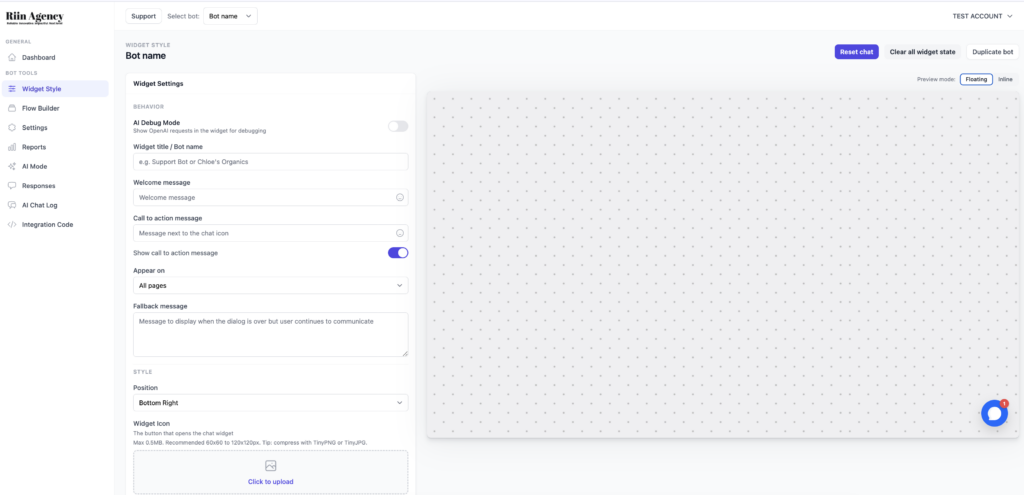
Bot Tools menu
The left menu now shows tools related only to this bot.
- Widget Style – how the chatbot looks on your website
- Flow Builder – how the conversation works
- Settings – advanced behavior and logic
- Reports – basic usage statistics
- AI Mode – AI chatbot configuration
- Responses – messages and leads from users
- AI Chat Log – AI-generated conversations
- Integration Code – install the bot on your website
You do not need to configure everything at once.
Widget Style (this page)
This page controls how the chatbot appears to visitors.
You can safely start here.
Widget Settings explained
- Widget title / Bot name – the name shown inside the chat window
- Welcome message – the first message users see
- Call to action message – text shown next to the chat icon
- Appear on – choose where the chatbot is visible
- Fallback message – message shown when the conversation ends
Start with a simple welcome message. You can refine later.
Preview area
The right side shows a live preview of your chatbot.
Any changes you make on the left will update the preview.
This helps you see how your chatbot will look before publishing.
Buttons at the top
- Reset chat – restart the conversation
- Clear all widget state – reset saved chat data
- Duplicate bot – create a copy of this bot
You can safely ignore these until later.
What should you do first?
For most users, the best order is:
- Set the widget name and welcome message
- Open the Flow Builder to design the conversation
- Test the bot in preview mode
- Install the bot on your website
You don’t need to finish everything during your first session.